









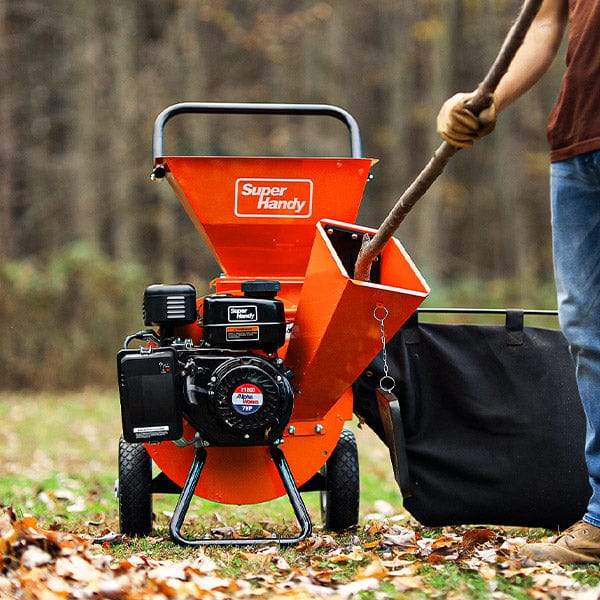
Why Off-Season Wood Chipper Storage Matters for Longevity
Your gas wood chipper is a powerful investment, designed to make quick work of yard debris. But when the chipping season ends, simply pushing it into a corner of the garage until spring is a recipe for trouble. Months of inactivity can lead to costly problems: stale fuel gums up the carburetor, moisture causes rust on the blades and engine components, and pests can build nests in engine housings.
Proper off-season storage is more than just a chore—it's preventative maintenance. Taking an hour to prepare your machine ensures it will start reliably when you need it again. It protects the engine, preserves the sharpness of the blades, and extends the overall life of your equipment, whether you own a versatile 3 IN 1 wood chipper or a heavy-duty model. A well-stored chipper is a long-lasting chipper.
Essential Pre-Storage Checks: What to Inspect Before Storing
Before you clean or service anything, give your wood chipper a thorough top-to-bottom inspection. Catching small issues now prevents them from becoming major headaches later. Power equipment is often used hard, and as the University of Florida Extension notes, putting tools away dirty or wet causes rust and damage. According to the University of Vermont Extension, it's wise to take the time to clean, inspect, and make any needed repairs to garden tools before storing them.
Look over the following areas on your gas wood chipper:
- Frame and Hoppers: Check for any cracks, dents, or broken welds.
- Wheels and Tires: Ensure tires are properly inflated and check for cracks or significant wear.
- Belts: Inspect any drive belts for signs of fraying, cracking, or glazing.
- Hardware: Check that all nuts, bolts, and screws are tight. Vibrations during operation can loosen them over time.
- Safety Features: Make sure all safety guards, shields, and auto-off mechanisms are intact and functional.

Step-by-Step Guide to Cleaning Your Gas Wood Chipper
A clean machine is less prone to rust, pest infestations, and mechanical failure. Trapped wood pulp and sap can hold moisture against metal surfaces, leading to corrosion.
- Safety First: Before starting, disconnect the spark plug wire to prevent any chance of an accidental engine start.
- Remove Surface Debris: Use a stiff brush and compressed air to blow away loose dirt, leaves, and wood chips from the engine cooling fins, wheels, and exterior housing.
- Clean the Chipping Chamber: Carefully open the blade housing according to your owner’s manual. Remove all impacted wood fragments, sap, and other debris. This is crucial for preventing the blades from rusting and seizing.
- Wipe It Down: Use a cloth lightly dampened with a mild degreaser to wipe down the entire machine, removing any built-up grime and sap. Avoid spraying water directly on the engine or any electrical components, especially on an electric-start towable wood chipper.
- Dry Thoroughly: Wipe the chipper completely dry with a clean cloth to remove all moisture.
Fuel System Preparation: Preventing Gumming and Corrosion
This is the single most important step for storing any gas-powered equipment. Over a few months, gasoline can degrade, leaving behind a gummy varnish that clogs carburetors and fuel lines. This is the number one reason a gas wood chipper won't start after storage. You have two reliable options:
- Option 1: Run the Engine Dry. The simplest method for a compact wood chipper is to run it until it stops from lack of fuel. This empties the tank, fuel lines, and carburetor, leaving nothing behind to degrade.
- Option 2: Use a Fuel Stabilizer. If you have a larger 4 inch wood chipper with a large tank, or prefer to keep fuel ready, a stabilizer is your best bet. Add the correct amount of stabilizer (follow the product’s instructions) to a tank of fresh gasoline. Then, run the engine for 5-10 minutes. This circulates the treated fuel through the entire system, protecting it from gumming and corrosion.
Engine Maintenance: Oil, Spark Plugs, and Cooling Systems
The engine is the heart of your gas wood chipper, and giving it some attention before storage is non-negotiable for a quick start next season.
- Change the Oil: Old, used oil contains contaminants and combustion byproducts that can damage internal engine components over time. Run the chipper for a few minutes to warm the oil, which helps it drain more completely. Then, turn it off, drain the old oil into an approved container, and refill it with fresh oil according to your owner's manual. This ensures the engine is lubricated with clean, protective oil during its long rest.
- Service the Spark Plug: Remove the spark plug and inspect it. If the electrode is worn or covered in heavy carbon deposits, it's best to replace it. If it's still in good shape, clean it with a wire brush and check the gap. Before reinstalling it, pour about a teaspoon of fresh engine oil into the cylinder, then slowly pull the starter cord a few times to distribute the oil and prevent rust.
- Clean Cooling Fins: Your chipper's engine is air-cooled. Over a season of use, the cooling fins can become clogged with wood chips, dust, and grime. Use a brush and compressed air to thoroughly clean these fins to prevent overheating when you start it up again.

Blade Care: Sharpening, Cleaning, and Protecting Your Chipper Blades
Dull, dirty blades not only perform poorly but are also susceptible to rust and corrosion during storage. Prepping them now saves you a major headache later.
First, disconnect the spark plug to prevent any accidental starts. Access the cutting chamber and carefully remove the chipper blades. Thoroughly clean them of all sap, resin, and wood debris using a stiff brush and a solvent like mineral spirits. Once clean and dry, inspect the edges. If they are dull, nicked, or rounded, now is the perfect time to have them sharpened or to flip them if you have a model with reversible blades. A sharp set of blades on a 3 IN 1 wood chipper makes all the difference in performance.
Before reinstalling or storing the blades separately, apply a light coat of all-purpose oil or a rust-inhibiting spray. This thin barrier will protect the metal from moisture and prevent rust from forming during the damp off-season months.
Battery Maintenance for Electric Start Models
If you own a powerful towable wood chipper with an electric start, don't forget the battery. A battery left connected and unattended for months will likely be dead when you need it.
Disconnect the battery terminals (negative first, then positive) and remove the battery from the chipper. Clean the terminals with a wire brush to remove any corrosion. Store the battery in a cool, dry place off the concrete floor, like on a wooden shelf in a garage or shed. For optimal battery health, connect it to a battery tender or trickle charger. These smart devices monitor the battery's charge and provide just enough power to keep it fully charged without overcharging, ensuring it's ready for an effortless start next spring.
Protecting the Chipper from Pests During Storage
A dormant wood chipper can look like a luxury hotel to rodents, insects, and other pests seeking shelter from the cold. They can build nests in the air filter housing, exhaust, or cooling shrouds, causing blockages and chewing through wires.
Take a few simple preventative steps. First, plug the exhaust outlet. A simple way to do this is to place a small plastic bag over the opening and secure it with a rubber band. Crucially, tie a bright, visible ribbon or tag to the bag as a reminder to remove it before you start the engine next season. Check the air intake and other openings for vulnerability. While a good cover helps, ensuring these entry points are sealed is your best defense against unwanted winter guests making a home in your valuable equipment.
Choosing the Right Storage Location: Indoor vs. Outdoor Considerations
Where you store your gas wood chipper can be the single most important factor in its off-season survival. The ideal location protects your investment from moisture, extreme temperatures, and pests.
Indoor Storage (Recommended) A dry, secure indoor space like a garage, shed, or barn is the best choice. Storing your machine indoors shields it from the damaging effects of rain, snow, and direct sunlight, which can cause rust, fade paint, and degrade plastic components. It also provides a stable temperature, preventing the expansion and contraction cycles that can stress engine parts. More portable models like a Mini wood chipper or a Compact wood chipper are often easy to fit into tight corners, making indoor storage convenient.
Outdoor Storage (If Necessary) If indoor space is unavailable, you can still protect your chipper outdoors with some precautions. Choose a spot that is sheltered, such as under a carport or a deep roof eave. Crucially, never store the chipper directly on grass or dirt. Place it on a concrete pad, paved surface, or on top of wooden pallets to keep it off the damp ground and allow for air circulation underneath.
Proper Covering and Environmental Protection for Your Chipper
Whether stored indoors or out, a quality cover is non-negotiable. Indoors, a cover keeps dust, dirt, and sawdust from settling on the engine and moving parts. For outdoor storage, it is your primary line of defense against the elements.
Choose a heavy-duty, waterproof cover specifically designed for outdoor equipment. Avoid using a simple plastic tarp, as it will trap moisture against the machine’s surface, creating a perfect environment for rust and mold. A proper cover should be breathable, allowing condensation to escape. Ensure the cover fits snugly and secure it with its built-in straps or bungee cords to prevent it from being blown away by strong winds.
Securing Your Wood Chipper Against Theft and Damage
A gas wood chipper is a valuable piece of equipment and an attractive target for thieves. Store it in a low-traffic, out-of-sight location whenever possible. For wheeled models, use a heavy-duty chain and a quality padlock to secure the frame to a permanent anchor point, such as a wall-mounted bracket or a sturdy post. If you own a larger Towable wood chipper, always use a coupler lock to prevent it from being hitched and hauled away. For extra security, you can also remove the battery and store it separately.
Preparing Your Chipper for Re-Use After Off-Season Storage
When chipping season returns, a few simple checks will ensure your machine starts up safely and reliably.
- Move and Inspect: Roll your wood chipper out to a well-ventilated area. Remove the cover and perform a thorough visual inspection. Look for any signs of pest nests, chewed wires, or physical damage. Check that all safety guards are secure and check the tire pressure.
- Check Fluids: If you used a fuel stabilizer, top off the tank with fresh gasoline. If you drained the tank before storage, fill it with fresh fuel now. Check the engine oil level with the dipstick and top it off if needed.
- Reconnect: Reconnect the spark plug wire. If your model has an electric start, reinstall the fully charged battery.
- Start-Up: Follow the starting procedure outlined in your owner’s manual. Allow the engine to run for several minutes to warm up before you begin chipping. Listen for any strange sounds; if anything seems off, shut the engine down immediately and troubleshoot the issue before operating.

Troubleshooting Common Off-Season Storage Issues
You followed the steps, stored your gas wood chipper for the winter, and now it’s time to tackle that spring cleanup. But what happens when your machine doesn’t cooperate? Despite our best efforts, issues can arise. Here’s how to troubleshoot the most common problems that occur after long-term storage.
Problem: The Engine Won't Start This is the most frequent and frustrating post-storage issue. Before you get discouraged, run through this simple checklist.
- The Cause: Stale fuel is the number one culprit. Over months, gasoline degrades, loses combustibility, and can clog fuel lines. For models with an electric start, like a powerful towable wood chipper, a dead battery is another common reason. Finally, a fouled spark plug can prevent the ignition spark.
- The Solution: First, drain the old fuel from the tank and carburetor bowl. Replace it with fresh, high-quality gasoline. Next, check the battery. If it's low, give it a full charge. If it won’t hold a charge, it’s time for a replacement. Lastly, remove and inspect the spark plug. If it’s black, oily, or corroded, clean it with a wire brush or, for best results, replace it. It’s an inexpensive part that makes a huge difference.
Problem: The Engine Starts but Runs Rough or Stalls If the engine sputters to life but won't stay running or lacks power, it's almost always a fuel delivery problem.
- The Cause: Even if you drained most of the fuel, residual amounts can evaporate and leave behind a sticky varnish that clogs the tiny, precise passages inside the carburetor. A dirty air filter can also choke the engine, preventing it from getting the air it needs to run smoothly.
- The Solution: Start with the easy fix: check the air filter. Clean or replace it as needed. If the problem persists, the carburetor is likely the issue. You can try a fuel system cleaner designed for small engines, but a proper cleaning is often necessary. This involves removing the carburetor, disassembling it, and cleaning the jets and passages with a dedicated solvent.
[IMAGE PLACEHOLDER]
Problem: I See Rust on the Chipper Body or Blades Finding orange spots of rust can be alarming, but it’s usually manageable.
- The Cause: The chipper was likely stored in a damp or humid environment without adequate protection, or it wasn't thoroughly dried after its pre-storage cleaning.
- The Solution: For the chipper housing, use a wire brush to remove the loose rust, then treat the area with a rust-inhibiting primer and touch-up paint to prevent it from spreading. Rust on the blades is more critical, as it can dull the edge and create imbalance. Remove the blades, clean them with a wire wheel or sandpaper, and sharpen them. This is crucial for every machine, from a Mini wood chipper to a professional-grade 4 inch wood chipper.
Problem: There's a Mouse Nest in the Engine! Unfortunately, rodents find the sheltered nooks of a stored engine to be a perfect home.
- The Cause: Small animals seek shelter from the elements, and the engine compartment of a wood chipper offers just that. They build nests with flammable materials and are notorious for chewing on electrical wiring.
- The Solution: Before attempting to start the engine, do a thorough inspection. Remove the engine cover and check the air intake and exhaust for nests or blockages. Carefully inspect all visible wiring for chew marks. If you find damaged wires, they must be repaired to prevent a short circuit or fire. This applies to all models, including a versatile 3 IN 1 wood chipper or a compact wood chipper.

Frequently Asked Questions About Storing Your Gas Wood Chipper
Do I really have to drain the fuel for winter storage?
Yes, managing the fuel system is the most critical step for off-season storage. You have two primary options. The first is to run the engine until the tank and carburetor are completely empty. This is the surest way to prevent fuel-related problems. The second option is to fill the tank to about 90% with fresh, ethanol-free gasoline and add a quality fuel stabilizer. After adding the stabilizer, run the engine for 5-10 minutes to ensure the treated fuel circulates through the entire system, including the carburetor. This prevents gasoline from going stale, gumming up fuel lines, and corroding sensitive engine parts.
Is it okay to store my wood chipper outside?
While storing your gas wood chipper in a dry, enclosed space like a garage or shed is always the best choice, outdoor storage is possible with the right precautions. If you must store it outside, choose a spot that is level and, if possible, sheltered from direct wind and precipitation, such as under a covered patio or carport. The most important thing is to use a high-quality, heavy-duty waterproof cover. Ensure the cover is also breathable to prevent condensation from building up underneath, which can lead to rust and mold. Tying the cover down securely will protect your machine from the elements and keep pests out.
What's the most important storage step if I'm short on time?
If you only have time for one or two tasks, focus on the fuel system and a basic cleaning. As mentioned above, stale fuel is the number one cause of a gas wood chipper not starting after storage. Either drain the fuel or add a stabilizer. After that, use compressed air or a stiff brush to quickly remove all wood chips, dirt, and sap from the hopper, discharge chute, and cutting chamber. Leftover organic material holds moisture and can cause significant rust and corrosion on the blades and housing over the winter.
Should I remove the battery for winter storage?
If your machine, like a towable wood chipper, has an electric start, then yes, you should absolutely address the battery. Cold temperatures can drain a battery and reduce its overall lifespan. Disconnect the negative terminal first, then the positive. Remove the battery and store it indoors in a cool, dry place away from freezing temperatures and direct sunlight. For best results, connect it to a battery tender or trickle charger to maintain a healthy charge level throughout the off-season, ensuring a quick start in the spring.
Related Products

Leave a comment
All comments are moderated before being published.
This site is protected by hCaptcha and the hCaptcha Privacy Policy and Terms of Service apply.